Overview
This guide will show you how to create a Rust web backend that uses MongoDB, a document-based database, to store data and Redis for caching, rate limiting, and notifications. For visibility purposes, created demo application will also be a web application that exposes REST API. Finally, the following architecture will be obtained:
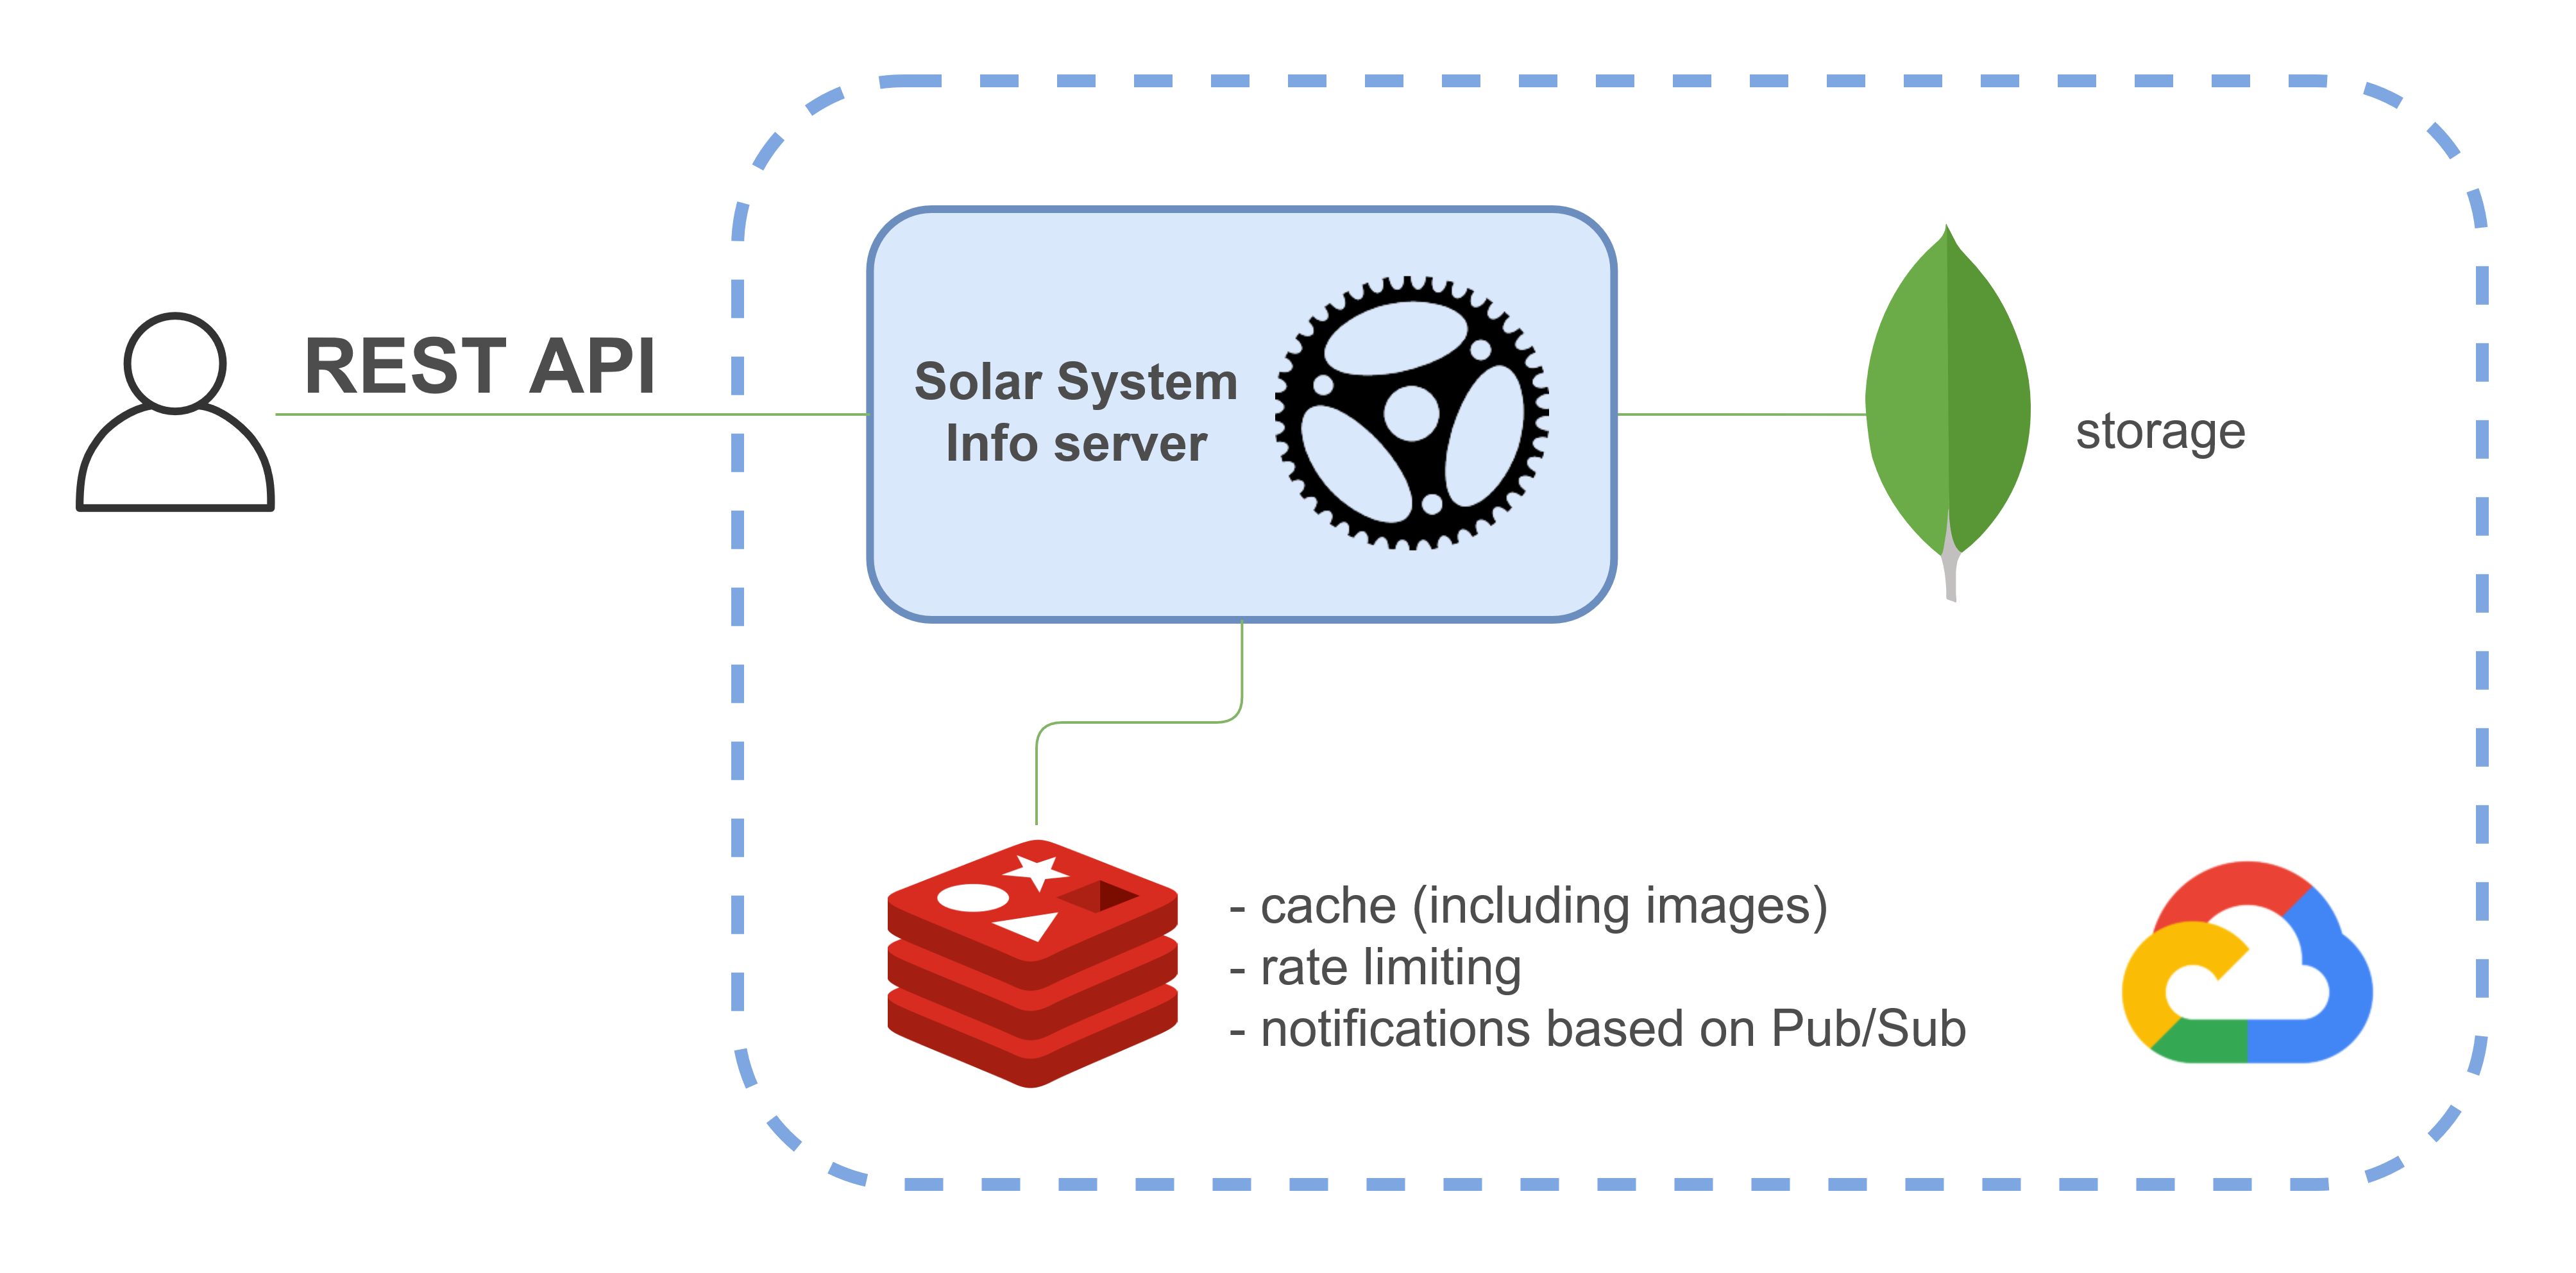
MongoDB acts as storage, whereas Redis is used for the following use cases:
-
cache (including images)
-
rate limiting for HTTP requests
-
notifications using publish-subscribe pattern
Please note that the specified use cases don’t mean that for a similar use case you should use an approach given in this article. First of all, the examples are intended to familiarize you with MongoDB and Redis.
The project is implemented
with MongoDB Rust driver and redis-rs crate.
You will also be able to test REST API of the application: it is deployed on Google Cloud Platform.
The domain model includes data about planets in the Solar System and their satellites.
Launch MongoDB and Redis
This section doesn’t require Rust skills and can be used regardless of a programming language used in an application.
Both tools can be launched as Docker containers:
docker-compose.ymlversion: '3.8'
services:
...
mongodb:
image: mongo
container_name: mongodb
restart: always
environment:
MONGO_INITDB_ROOT_USERNAME: $MONGODB_USERNAME
MONGO_INITDB_ROOT_PASSWORD: $MONGODB_PASSWORD
MONGO_INITDB_DATABASE: solar_system_info
ports:
- 27017:27017
mongodb-seed:
image: mongo
container_name: mongodb-seed
depends_on:
- mongodb
volumes:
- ./mongodb-init:/mongodb-init
links:
- mongodb
command:
mongoimport --host mongodb --db solar_system_info --collection planets --authenticationDatabase admin --username $MONGODB_USERNAME --password $MONGODB_PASSWORD --drop --jsonArray --file /mongodb-init/init.json
redis:
image: redis:alpine
container_name: redis
ports:
- 6379:6379The purpose of mongodb-seed container will be described further.
You can access mongo shell by running the following command:
docker exec -it mongodb mongo --username admin --password password
(where mongodb is the name of the Docker container, mongo is the shell)
Next, you can start executing commands, for example:
-
list all databases using
show dbs -
list all inserted data
-
use solar_system_info -
show collections -
db.planets.find()
-
Redis CLI can be accessed by using the following command:
docker exec -it redis redis-cli
The simplest example of a command looks like this:
> set mykey somevalue
OK
> get mykey
"somevalue"
To see all keys use keys * command.
You can find more examples of Redis CLI commands in this guide.
Data initialization
MongoDB is initialized with JSON data
using mongodb-seed container and mongoimport command running inside it:
docker-compose.ymlmongodb-seed:
image: mongo
container_name: mongodb-seed
depends_on:
- mongodb
volumes:
- ./mongodb-init:/mongodb-init
links:
- mongodb
command:
mongoimport --host mongodb --db solar_system_info --collection planets --authenticationDatabase admin --username $MONGODB_USERNAME --password $MONGODB_PASSWORD --drop --jsonArray --file /mongodb-init/init.jsonAlso, the database initialization can be performed using JavaScript file.
The application also serves images of planets. My first thought was to store them in MongoDB; that can be performed using the following command:
mongofiles --host mongodb --db solar_system_info --authenticationDatabase admin --username $MONGODB_USERNAME --password $MONGODB_PASSWORD put /mongodb-init/images/*.jpg
But then it turned out that the images can’t be read from the database due to the lack of GridFS
support in MongoDB Rust Driver (open ticket). So for simplicity purposes, I
decided to use rust_embed crate which allows including images in the application
binary at compile time (at the development time they are loaded from a file system). (It is also possible to store images separately from the application; images folder should be mounted as a volume in the
Docker Compose service definition)
Next, you will see how MongoDB and Redis can be used in a Rust application.
Implementation of the application
Dependencies
The application is implemented using:
Cargo.toml[package]
name = "mongodb-redis"
version = "0.1.0"
edition = "2018"
[dependencies]
mongodb = "2.0.0-beta.1"
redis = { version = "0.20.2", features = ["tokio-comp", "connection-manager"] }
actix-web = "4.0.0-beta.7"
tokio = "1.7.1"
tokio-stream = "0.1.6"
chrono = { version = "0.4.19", features = ["serde"] }
serde = "1.0.126"
serde_json = "1.0.64"
dotenv = "0.15.0"
derive_more = "0.99.14"
log = "0.4.14"
env_logger = "0.8.4"
rust-embed = "5.9.0"
mime = "0.3.16"Project structure
├───images
│
├───mongodb-init
│       init.json
│
└───src
        db.rs
        dto.rs
        errors.rs
        handlers.rs
        index.html
        main.rs
        model.rs
        redis.rs
        services.rs
main function
main function#[actix_web::main]
async fn main() -> std::io::Result<()> {
dotenv::from_filename(".env.local").ok();
env_logger::init();
info!("Starting MongoDB & Redis demo server");
let mongodb_uri = env::var("MONGODB_URI").expect("MONGODB_URI env var should be specified");
let mongodb_client = MongoDbClient::new(mongodb_uri).await;
let redis_uri = env::var("REDIS_URI").expect("REDIS_URI env var should be specified");
let redis_client = redis::create_client(redis_uri)
.await
.expect("Can't create Redis client");
let redis_connection_manager = redis_client
.get_tokio_connection_manager()
.await
.expect("Can't create Redis connection manager");
let planet_service = Arc::new(PlanetService::new(
mongodb_client,
redis_client,
redis_connection_manager.clone(),
));
let rate_limiting_service = Arc::new(RateLimitingService::new(redis_connection_manager));
...
}Here custom MongoDbClient, Redis client, and Redis connection manager are created.
Working with MongoDB
Let’s start with the function that returns all planets stored in the database and uses async API:
const DB_NAME: &str = "solar_system_info";
const COLLECTION_NAME: &str = "planets";

pub async fn get_planets(
    &self,
    planet_type: Option<PlanetType>,
) -> Result<Vec<Planet>, CustomError> {
    let filter = planet_type.map(|pt| {
        doc! { "type": pt.to_string() }
    });

    let mut planets = self.get_planets_collection().find(filter, None).await?;

    let mut result: Vec<Planet> = Vec::new();
    while let Some(planet) = planets.next().await {
        result.push(planet?);
    }

    Ok(result)
}

fn get_planets_collection(&self) -> Collection<Planet> {
    self.client
        .database(DB_NAME)
        .collection::<Planet>(COLLECTION_NAME)
}
get_planets also contains the example on how to filter MongoDB documents by some criteria.
Data models are defined as follows:
#[derive(Serialize, Deserialize, Debug)]
pub struct Planet {
    #[serde(rename = "_id", skip_serializing_if = "Option::is_none")]
    pub id: Option<ObjectId>,
    pub name: String,
    pub r#type: PlanetType,
    pub mean_radius: f32,
    pub satellites: Option<Vec<Satellite>>,
}

#[derive(Copy, Clone, Eq, PartialEq, Serialize, Deserialize, Debug)]
pub enum PlanetType {
    TerrestrialPlanet,
    GasGiant,
    IceGiant,
    DwarfPlanet,
}

#[derive(Serialize, Deserialize, Debug)]
pub struct Satellite {
    pub name: String,
    pub first_spacecraft_landing_date: Option<mongodb::bson::DateTime>,
}
The structures contain fields of some common types (string, f32), as well as of:
-
ObjectId(Planet.id) -
list (
Planet.satellites) -
date/timestamp (
Satellite.first_spacecraft_landing_date) -
enum (
Planet.type) -
nullable fields (
Planet.id,Planet.satellites)
The project also contains examples on how to get, create, update, and delete MongoDB documents. I won’t stop in detail on these functions due to the obvious code of their implementation. You can test the functions using REST API methods:
-
get all planets
Example with filtering:
-
create planet
Body:
{ "name": "Pluto", "type": "DwarfPlanet", "mean_radius": 1188, "satellites": null } -
get planet by id
-
update planet
Body:
{ "name": "Mercury", "type": "TerrestrialPlanet", "mean_radius": 2439.7, "satellites": null } -
delete planet
-
get image of a planet
Use it to test caching with Redis
MongoDB documents are stored in BSON format.
Working with Redis
Redis client is created as follows:
pub async fn create_client(redis_uri: String) -> Result<Client, RedisError> {
    Ok(Client::open(redis_uri)?)
}
Redis connection manager can be created like this:
let redis_client = redis::create_client(redis_uri)
    .await
    .expect("Can't create Redis client");
let redis_connection_manager = redis_client
    .get_tokio_connection_manager()
    .await
    .expect("Can't create Redis connection manager");
Cache
Let’s consider the service layer’s function that is used to retrieve a planet by id:
pub async fn get_planet(&self, planet_id: &str) -> Result<Planet, CustomError> {
    let cache_key = self.get_planet_cache_key(planet_id);
    let mut con = self.redis_client.get_async_connection().await?;

    let cached_planet = con.get(&cache_key).await?;
    match cached_planet {
        Value::Nil => {
            debug!("Use database to retrieve a planet by id: {}", &planet_id);
            let result: Planet = self
                .mongodb_client
                .get_planet(ObjectId::from_str(planet_id)?)
                .await?;

            let _: () = redis::pipe()
                .atomic()
                .set(&cache_key, &result)
                .expire(&cache_key, 60)
                .query_async(&mut con)
                .await?;

            Ok(result)
        }
        Value::Data(val) => {
            debug!("Use cache to retrieve a planet by id: {}", planet_id);
            Ok(serde_json::from_slice(&val)?)
        }
        _ => Err(RedisError {
            message: "Unexpected response from Redis".to_string(),
        }),
    }
}
If a key is not presented in the cache (Nil arm), key-value pair is put to Redis using set function (with auto
expiration (its purpose will be described later)); in the second arm of match expression cached value is converted to
the target structure.
To put a value to the cache, you need to implement ToRedisArgs trait for a
structure:
ToRedisArgs traitimpl ToRedisArgs for &Planet {
fn write_redis_args<W>(&self, out: &mut W)
where
W: ?Sized + RedisWrite,
{
out.write_arg_fmt(serde_json::to_string(self).expect("Can't serialize Planet as string"))
}
}In get_planet function, Redis async connection is used. The following code snippet demonstrates another approach,
ConnectionManager, on the example of clearing cache using del function:
pub async fn update_planet(
    &self,
    planet_id: &str,
    planet: Planet,
) -> Result<Planet, CustomError> {
    let updated_planet = self
        .mongodb_client
        .update_planet(ObjectId::from_str(planet_id)?, planet)
        .await?;

    let cache_key = self.get_planet_cache_key(planet_id);
    self.redis_connection_manager.clone().del(cache_key).await?;

    Ok(updated_planet)
}
Something can go wrong after successful entity updating (or removal); for example, a problem with the network is possible
which will result in an error when calling Redis, or application shutdown/restart so that del function won’t be called.
That can lead to incorrect data in cache; consequences of that can be reduced by auto expiration of cached entries described earlier.
ConnectionManager can be cloned. It is also used
in all the remaining Redis examples instead of Redis client.
Images cache can be implemented like a cache of other data types (using set/get functions):
pub async fn get_image_of_planet(&self, planet_id: &str) -> Result<Vec<u8>, CustomError> {
    let cache_key = self.get_image_cache_key(planet_id);
    let mut redis_connection_manager = self.redis_connection_manager.clone();

    let cached_image = redis_connection_manager.get(&cache_key).await?;
    match cached_image {
        Value::Nil => {
            debug!(
                "Use database to retrieve an image of a planet by id: {}",
                &planet_id
            );
            let planet = self
                .mongodb_client
                .get_planet(ObjectId::from_str(planet_id)?)
                .await?;
            let result = crate::db::get_image_of_planet(&planet.name).await;

            let _: () = redis::pipe()
                .atomic()
                .set(&cache_key, result.clone())
                .expire(&cache_key, 60)
                .query_async(&mut redis_connection_manager)
                .await?;

            Ok(result)
        }
        Value::Data(val) => {
            debug!(
                "Use cache to retrieve an image of a planet by id: {}",
                &planet_id
            );
            Ok(val)
        }
        _ => Err(RedisError {
            message: "Unexpected response from Redis".to_string(),
        }),
    }
}
Caching can be tested using REST API described above.
Rate limiting
Rate limiting is implemented accordingly with the official guide as follows:
#[derive(Clone)]
pub struct RateLimitingService {
    redis_connection_manager: ConnectionManager,
}

impl RateLimitingService {
    pub fn new(redis_connection_manager: ConnectionManager) -> Self {
        RateLimitingService {
            redis_connection_manager,
        }
    }

    pub async fn assert_rate_limit_not_exceeded(&self, ip_addr: String) -> Result<(), CustomError> {
        let current_minute = Utc::now().minute();
        let rate_limit_key = format!("{}:{}:{}", RATE_LIMIT_KEY_PREFIX, ip_addr, current_minute);

        let (count,): (u64,) = redis::pipe()
            .atomic()
            .incr(&rate_limit_key, 1)
            .expire(&rate_limit_key, 60)
            .ignore()
            .query_async(&mut self.redis_connection_manager.clone())
            .await?;

        if count > MAX_REQUESTS_PER_MINUTE {
            Err(TooManyRequests {
                actual_count: count,
                permitted_count: MAX_REQUESTS_PER_MINUTE,
            })
        } else {
            Ok(())
        }
    }
}
For every minute per IP address, Redis key is created. After each call of assert_rate_limit_not_exceeded function, the value
is incremented by 1. To make sure we don’t fill up our entire database with junk, the key is expired after one minute.
Rate limiter can be used in Actix handler like this:
pub async fn get_planets(
req: HttpRequest,
web::Query(query_params): web::Query<GetPlanetsQueryParams>,
rate_limit_service: web::Data<Arc<RateLimitingService>>,
planet_service: web::Data<Arc<PlanetService>>,
) -> Result<HttpResponse, CustomError> {
rate_limit_service
.assert_rate_limit_not_exceeded(get_ip_addr(&req)?)
.await?;
let planets = planet_service.get_planets(query_params.r#type).await?;
Ok(HttpResponse::Ok().json(planets.into_iter().map(PlanetDto::from).collect::<Vec<_>>()))
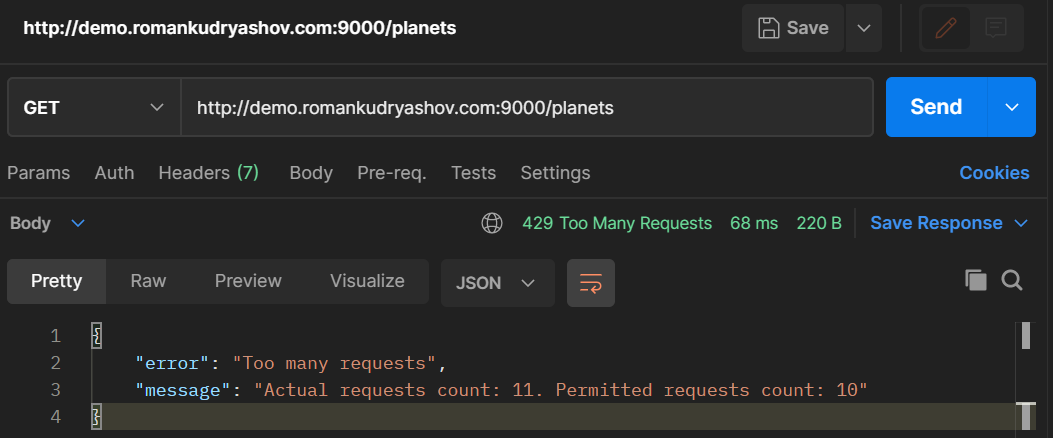
}If you try to call the method of getting planets too often, you’ll get the following error:
Notifications
In this project, notifications are implemented using Redis' Pub/Sub and Server-Sent Events to deliver events to a user.
An event is published when a planet is created:
pub async fn create_planet(&self, planet: Planet) -> Result<Planet, CustomError> {
    let planet = self.mongodb_client.create_planet(planet).await?;
    self.redis_connection_manager
        .clone()
        .publish(
            NEW_PLANETS_CHANNEL_NAME,
            serde_json::to_string(&PlanetMessage::from(&planet))?,
        )
        .await?;
    Ok(planet)
}
Subscription is implemented in this way:
pub async fn get_new_planets_stream(
    &self,
) -> Result<Receiver<Result<Bytes, CustomError>>, CustomError> {
    let (tx, rx) = mpsc::channel::<Result<Bytes, CustomError>>(100);

    tx.send(Ok(Bytes::from("data: Connected\n\n")))
        .await
        .expect("Can't send a message to the stream");

    let mut pubsub_con = self
        .redis_client
        .get_async_connection()
        .await?
        .into_pubsub();
    pubsub_con.subscribe(NEW_PLANETS_CHANNEL_NAME).await?;

    tokio::spawn(async move {
        while let Some(msg) = pubsub_con.on_message().next().await {
            let payload = msg.get_payload().expect("Can't get payload of message");
            let payload: String = FromRedisValue::from_redis_value(&payload)
                .expect("Can't convert from Redis value");
            let msg = Bytes::from(format!("data: Planet created: {:?}\n\n", payload));
            tx.send(Ok(msg))
                .await
                .expect("Can't send a message to the stream");
        }
    });

    Ok(rx)
}
The subscription is used in Actix handler in this way:
pub async fn sse(
    planet_service: web::Data<Arc<PlanetService>>,
) -> Result<HttpResponse, CustomError> {
    let new_planets_stream = planet_service.get_new_planets_stream().await?;
    let response_stream = tokio_stream::wrappers::ReceiverStream::new(new_planets_stream);

    Ok(HttpResponse::build(StatusCode::OK)
        .insert_header(header::ContentType(mime::TEXT_EVENT_STREAM))
        .streaming(response_stream))
}
To test notifications, you need to subscribe to notifications and generate an event. I’ll show you two approaches for this; in both the event is generated using cURL:
-
subscription from a browser
Navigate to
http://localhost:9000/where HTML page is accessible: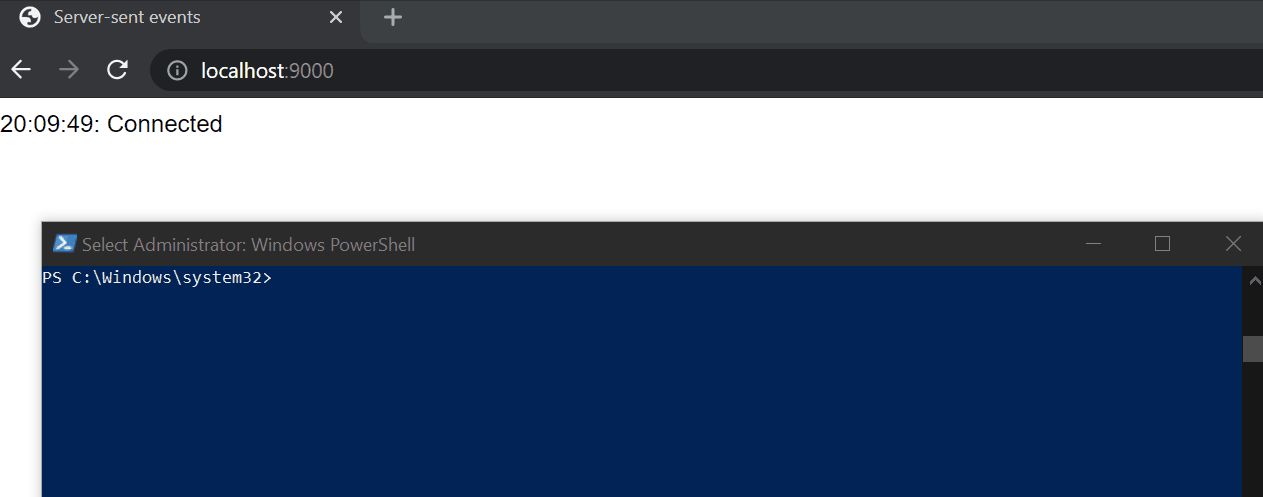
-
subscription from a command line using cURL
Use
curl -X GET localhost:9000/events: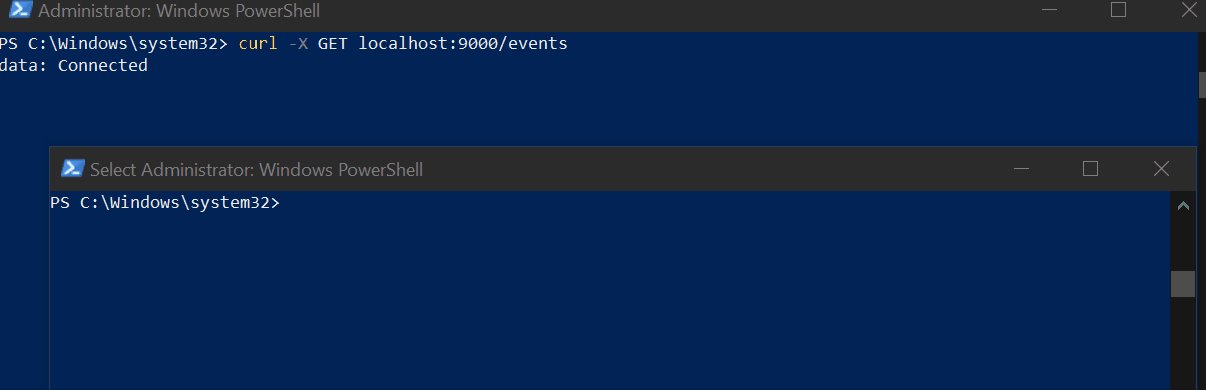
To generate the event the following cURL request was used:
curl -X POST -H 'Content-Type: application/json' -d '{
    \"name\": \"Pluto\",
    \"type\": \"DwarfPlanet\",
    \"mean_radius\": 1188,
    \"satellites\": null
}' localhost:9000/planets
Web application
Some parts of this topic were included in the previous sections, so now only uncovered stuff will be explained.
REST API handlers
REST API handlers are defined in this way:
#[actix_web::main]
async fn main() -> std::io::Result<()> {
    ...

    let enable_write_handlers = env::var("ENABLE_WRITE_HANDLERS")
        .expect("ENABLE_WRITE_HANDLERS env var should be specified")
        .parse::<bool>()
        .expect("Can't parse ENABLE_WRITE_HANDLERS");

    HttpServer::new(move || {
        let mut app = App::new()
            .route("/planets", web::get().to(handlers::get_planets))
            .route("/planets/{planet_id}", web::get().to(handlers::get_planet))
            .route(
                "/planets/{planet_id}/image",
                web::get().to(handlers::get_image_of_planet),
            )
            .route("/events", web::get().to(handlers::sse))
            .route("/", web::get().to(handlers::index))
            .data(Arc::clone(&planet_service))
            .data(Arc::clone(&rate_limiting_service));

        if enable_write_handlers {
            app = app
                .route("/planets", web::post().to(handlers::create_planet))
                .route(
                    "/planets/{planet_id}",
                    web::put().to(handlers::update_planet),
                )
                .route(
                    "/planets/{planet_id}",
                    web::delete().to(handlers::delete_planet),
                );
        }

        app
    })
    .bind("0.0.0.0:9000")?
    .run()
    .await
}
Error handling
Error handling is implemented accordingly with the documentation.
Launch and testing
For launching the project locally you have two options:
-
using Docker Compose (
docker-compose.yml):docker compose up(ordocker-compose upin older Docker versions) -
without Docker
Start the application using
cargo run(in this case,mongodb-redisservice should be disabled in thedocker-compose.yml)
CI/CD
CI/CD is configured using GitHub Actions workflow that builds Docker image of the application and deploys it on Google Cloud Platform.
To access REST API of the deployed application, you can use one of the available GET endpoints, for example:
Writing methods of REST API are disabled on the production environment.
Conclusion
In this article, I showed how to start with MongoDB and Redis and the basics of how to use them in a Rust application. Feel free to contact me if you have found any mistakes in the article or the source code. Thanks for reading!